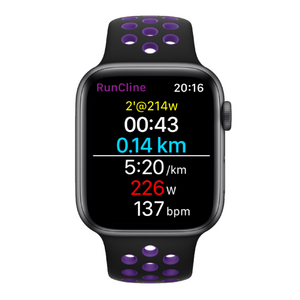
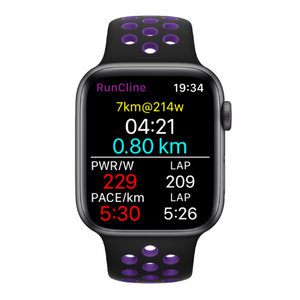
Main Page
RunCline - Add incline to your run! And more!
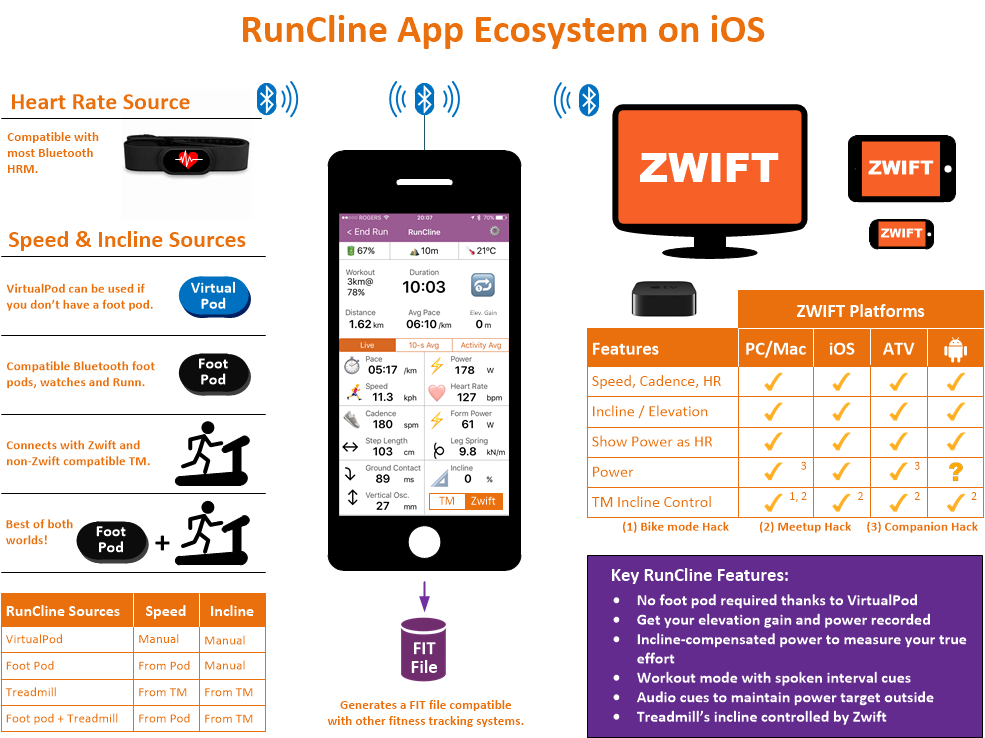
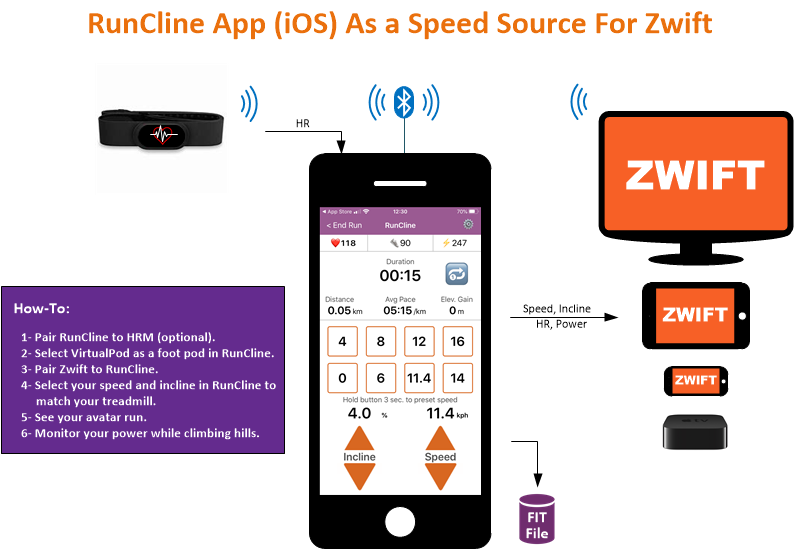
RunCline provides incline information entered manually in the app and transmits it automatically over Bluetooth. Alternatively, it can read incline directly from your smart treadmill. It will also connect to an external foot pod and/or heart rate monitor and re-transmit the collected metrics over Bluetooth. What's the purpose? You can pair the phone or tablet running RunCline with Zwift and get incline, power, speed, cadence and heart rate. RunCline will also display all metrics on screen for you to view during your running. What's even better? Some smart-er treadmills can also be controlled by RunCline and make them track incline from Zwift on PC or Zwift on Mac.
Requirements: You need to pair a compliant Bluetooh foot pod and/or supported smart treadmill to RunCline to use the app.
Pairing screen
- Select one foot pod or smart treadmill in range (required)
- Select one heart rate monitor in range (optional)
- The "Searching" button will display "Start" once the foot pod device or smart treadmill is paired. If the Start button does not appear within 5 seconds, you may need to activate your foot pod by running or walking.
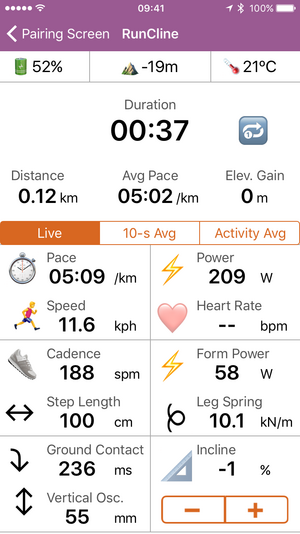
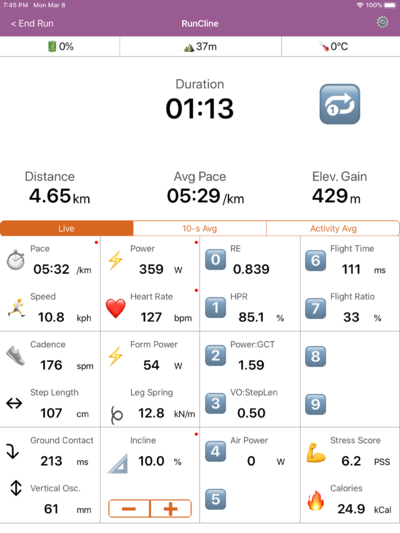
RunCline screen. The running metrics from the foot pod, smart treadmill and/or heart rate monitor will be displayed on screen and re-transmitted over Bluetooth. All running metrics are also saved to a .FIT file that can be emailed or exported after the run. Past 7-day activities can be accessed using the 🔍 icon in the Pairing Screen.
- Select "Live" to display live metrics or "10-second" to get average metrics from the past 10 seconds.
- Use the + and - buttons to select the incline (if no smart treadmill connected).
- You can click the Volume Up and Down buttons on your phone or tablet to get live audio stats.
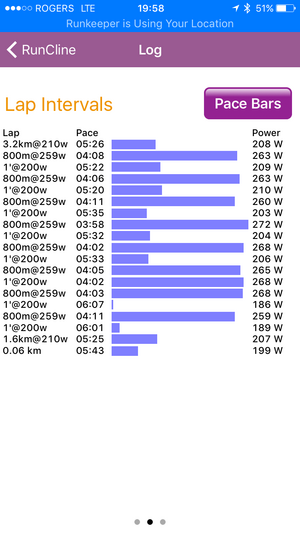
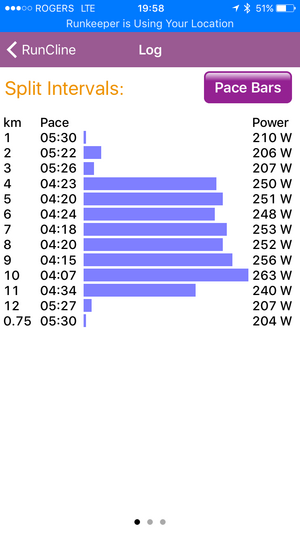
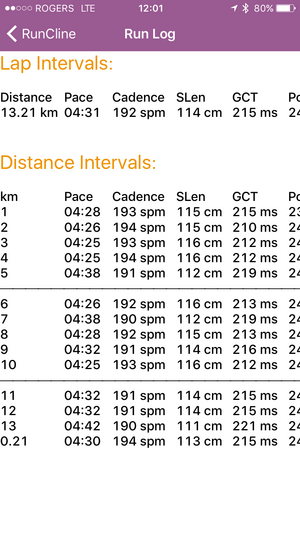
Runcline can be used to run outside. It will provide audio cues at every kilometer or mile. If you are running with power, it can provide audio cues to keep you within your power target. You can define workouts by pace, distance or power. RunCline will notify you at the beginning of each interval. Once your workout is completed, the log report includes detailed results of your run with a summary of all running metrics from your foot pod and more.
Supported Bluetooth Devices
List of devices supported as foot pods
- Stryd
- Zwift RunPod
- MilestonePod
- Runn from NPE
- Garmin foot pods with >CABLE from NPE
- Garmin watches like Fenix with Virtual Run
List of supported Smart Treadmills
| Manufacturer | Confirmed Models | Controllable (*) |
|---|---|---|
| Bodycraft | T1000 | No |
| Bowflex | BXT128, BXT116, BXT216 | No |
| CareFitness | Marathon 22, all? | Yes |
| Decathlon/DKN | Run, RoadRunner i/B, EZRun | Yes? |
| Domyos | TC and Intense Run, others? | Yes |
| FitnessFocus | All | Yes? |
| FitShow/SereneLife | StayFit CTX-7, all? | Yes |
| FlowFitness | DTM2000i, T3i, others? | Yes? |
| Horizon | T202, Omega Z | Yes |
| Horizon | Paragon X | Not yet |
| Horizon 2020+ (No incline) | 7.0AT, 7.4AT, 7.8AT | Yes |
| i-Console/i-Running | All | Yes |
| JTX Fitness | Club Pro, Sprint 5, 7 & 9, all? | Yes |
| Kettler (No incline) | S2, S4, S6, S8, S10 | No |
| Landice | L5, L8 | No? |
| LifeFitness | F3, T3, T5 with Track Connect | Yes |
| NoblePro | Elite E8i | Yes |
| NordicTrack | C850S, C970PRO, S20, S25, S30, T6.5, T7, T10, Z1300i | No? |
| Polar | All | Yes |
| Pro-Form | 525i, 545i, 575i, 995i, Carbon XL, Pro 1500, Pro 2000, Sport 6.0 | No? |
| Reebok | GT50, GT60, SL8.x, Jet 300, all? | Yes |
| SpiritFitness | XT285, 385, 485, 685, CT800 | Only non-US models |
| Sportstech | F37, others? | Unknown? |
| Sole | S77, F63, F65, F80, F85 and TT8 | Only non-US models |
| Taurus | T10.3 | Yes? |
| Technogym | MyRUN | Not yet! |
| Titan Life | S Line 750, 850 | Yes |
| TrueFitness | PS800 | Yes? |
| Tunturi | T90 | Yes |
| WalkingPad | T1Pro, T2Pro | No |
| Woodway | 4FRONT 2016+, Mercury?, Path? | Yes? |
| XTERRA | TRX3500, 4500 | ? |
| Treadmills with GEM Retro module | Precor, Star Trac | Yes for Precor |
| Other models may work | Try them | Maybe |
(*) Controllable means RunCline can send commands to the treadmill to control its incline.
Yes? Means most likely based on the protocol, but no confirmation
No? Means not yet but not impossible.
Bluetooth and Precise Location Permissions
RunCline asks for precise location permission when starting the app for the first time. It's been a requirement from Apple when Bluetooth needs to connect to external devices. Be sure your location is not share with me or others. It is just a requirement from Apple for an app to use Bluetooth.
Incline Control
There are a few ways for RunCline to control the incline of your treadmill but you need a smart treadmill that is compatible and controllable with RunCline. See the list of supported treadmills to know if your treadmill is supported.
Incline Control Using a GPX Elevation Profile
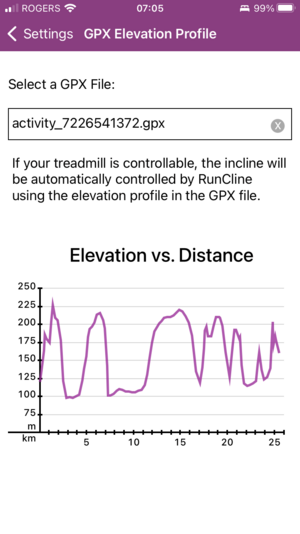
If you provide a GPX file to RunCline, it can automatically control the inclination of your treadmill based on the distance and elevation in the file. Note that some treadmills do not support negative incline so incline will be clipped to 0% instead of going negative.
To do this, just follow these steps:
- In the RunCline Settings, scroll to "GPX Elevation Profile" and select a GPX file already on your device. A graph showing the elevation profile in the GPX should be displayed.
- Go back to the main menu and click the "Start with GPX" button. If you just see the "Start" button, it is possible your treadmill is not controllable by RunCline or no GPX file was loaded.
- In the Run Screen, you should see the TM/GPX buttons. Select TM if you want temporarily control the treadmill's inclination manually. Select GPX if you want the inclination to be controlled by RunCline according to the elevation in the GPX. If you do not see the TM/GPX buttons, it is possible your treadmill is not controllable by RunCline.
If you have a FIT file instead of a GPX, you can use an online web converter like "Route Converter" to convert the FIT file to a GPX file.
Incline Control With Zwift
When using RunCline, Zwift can control the incline of your treadmill under certain conditions. For this to work, you need to execute the following hack procedures to ensure Zwift sends the incline data to RunCline. Let's hope one day Zwift will make this easier to do.
Hack #2 for ALL Zwift platforms
That means Zwift on iOS, AppleTV and most likely Android. Credit goes to David Bannister for discovering this other loophole. I would never have thought of that. Be ready to be amazed! Be ready to be confused! 😜
General idea: You need to setup a meetup! You pair in bike mode and wait on the road with your bike to get a notification for the meetup. Once you joined the meetup you use the Menu to go in pairing mode and select your running devices then go back to your activity. By doing this, Zwift forgets to reset the Bluetooth connection and will continue to send incline control packets to RunCline which will send them back to your treadmill.
Detailed procedure:
- Setup a meetup with any duration. Incline control will stay after the meetup ends so why not just set a 0km meetup? You’ll know why I propose a 0.1km meetup in a bit.
- Pair your TM in RunCline (and possibly a foot pod and/or HRM).
- Start Zwift and go in BIKE mode. Pair both Power and Controllable. Start a ride, select a route and go on the road. You are now on the road with your bike.
- Wait for the meetup to be announced and hit the Join button when it shows up.
- Now you are back on the road but in RUN mode. You need to pair in Zwift again. Hit the Menu button and select the RunCline devices again for Speed, Cadence and HRM then get back to the road.
- Now, you are ready to run and you still get incline controls. Use the TM/ZWIFT buttons in RunCline to switch between manual TM controls and Zwift incline control.
Based on David’s idea above, I wanted to know if it would work with scheduled events? Yes and no. No, a running event will not show up in bike mode BUT a running event will show up in a meetup. So, let’s me explain the general idea: Incline control for schedule events: Setup a 0.1km meetup so that it ends immediately before your scheduled event. You join the meetup. Once the meetup ends, you still keep incline control. Once the scheduled event occurs you’ll get another Join button and you’ll jump in that event without losing incline control.
So, the detailed steps are as follow:
0- Setup your scheduled event as usual. Then setup a meetup that will end 5 to 30 minutes before your scheduled event using the procedure above.
Follow steps 1 to 6 above
7- When you see the Join button for the scheduled event then click it. Enjoy the event with your TM’s incline controlled by Zwift through RunCline.
Hack #1 for Zwift on PC or Mac only
- Start Zwift on PC or Mac (not iOS, not tvOS).
- Pair to RunCline in BIKE mode. Pair both Speed and Controllable.
- Start your ride.
- Quit game (escape then trash ride).
- Restart Zwift.
- Let it pair in bike mode. Don’t touch anything. Once paired, just go back in Run mode and pair again with RunCline. A green dot should appear beside Incline in RunCline.
- Start your run.
Edit: Well, it looks like Zwift has changed their code and Hack #1 is not working anymore. Use Hack #2 for Zwift on PC/Mac as well. It still works.
Power in Zwift
Zwift can record power under certain conditions but that depends which Zwift platform you are using. It is a bit simpler for iOS (iPhone or iPad) but more complex on all other Zwift platforms. In the end, this will allow you to see power in Companion after your activity ends and in other platforms Zwift exports to: Strava, GarminConnect, TrainingPeaks, Today'sPlan, etc... If you do this right (or if I explained this right), power will be recorded by Zwift and exported automatically to other platforms. You will not see anything during your run. One possibility is to look at the power in RunCline but if you want to see it in Zwift, you could enable "Power as HR" in RunCline's Settings and RunCline will show power as Heart Rate in Zwift. Obviously, you will not get HR anymore but you probably don't care about HR if you are running with power.
Edit: Power recording is not working anymore on Zwift. Sorry. Not my fault.
Power Recording Hack #1 for Zwift on iOS
Very simple. Zwift on iOS (iPhone, iPad) will record power automatically is you simply rename the device running RunCline on iOS to "Stryd" (without quotes). Go on the iOS's Settings of the device running RunCline, General, About, Name and set it to "Stryd" (without quotes).
Power Recording Hack #2 for Zwift on PC, Mac and AppleTV
Zwift cannot record power directly when it received both power and incline by Bluetooth. Don't ask why. But, there is a more complex scheme involving a 3rd device running Companion that will make it record it.
- Configure Zwift to receive data from Companion instead of direct Bluetooth. There is a Settings icon top-right in the Zwift pairing screen to configure this. It may appear directly in the pairing screen top left as well for ATV. Close Zwift.
- Configure Companion to allow Zwift to connect to your BLE devices through Bluetooth. You will find thins in More, Settings then Device Connection.Close Companion.
- Start RunCline and pair with your Bluetooth devices.
- Start Companion.
- Start Zwift. While pairing, you should be able to select RunCline. You should see a Bluetooth icon in Companion as well.
Workouts
You can define a Workout in the Settings and it will automatically start on your next run. The Workout String can be entered as a series of Duration@Effort@Incline separated by a + sign. Effort and Incline are optional parameters so the following combinations are possible:
- Duration
- Duration@Effort
- Duration@Incline
- Duration@Effort@Incline
The sections below will provide more information on each of the parameters.
Duration
Duration can be defined by time or distance.
Time is defined in minutes or seconds using the characters ' (quote) and " (double quote) respectively. Minutes are a real number with fractions followed by the ' character. For example: 1', 1.5', 5'. Seconds must be an integrer number followed by the " character. For example: 30" , 85", .... One minute and a half can be described as 90" or 1.5". Do not use fractions with seconds.
Distance is defined in kilometers (km) or miles (mi). Both can have fractions. For example: 1.5km, 2mi, ....
Effort
Effort can be defined by:
- Pace (4:30/km, 9:00/mi, ...)
- Speed (13.3kph, 6.2mph, ...)
- Power (200w, 350w, ...) or
- %CP/FTP (80%, 105%, ...).
In the latter case, %CP must be above 25% to be considered as an effort otherwise it may be confused for incline. The effort parameter is optional. You can omit it if you don't target a specific effort for that segment.
The effort can also be a range by using the - character. For example: 5'@300w-310w, 1km@4:30/km-4:40/km, 1mi@70%-80%, ... The range values will be used for audio cues to keep you in the effort range. When no range is specified, RunCline assumes +/- 3W for power and +/- 3 seconds for pace by default.
Incline
Incline is a % gradient using a fractional number (if desired) equal or below 25%. For example: 3%, 5.5%, ... The incline parameter is optional. When not used, it is assumed to be 0%. For a better experience, only use fractional incline numbers if your treadmill supports them otherwise stick to integer numbers.
Repetitions
Repetitions are possible using the number x ( ... ) syntax format. For example: 3x(1'@4:30/km + 3'@6:00/km). The repetition count must be an integrer number from 1 to 99. The zero multiplier can be used to discard the entire repetition. Note that the parenthesis () are mandatory even for a single segment like 3x(1km@300w). Only one level of parenthesis is allowed. It is not possible to nest repetitions.
Graphic Preview
The syntax is pretty strict. Make sure to follow the rules above or it may crash the app or produce the wrong result. Click the Update button to get a graph representation of your workout. It is a great way to ensure you properly described your workout. It will also produce estimates of your distance, time, average power and Power Stress Score (PSS). These are estimates only and they depend on how your workout is defined. If you define your workout in time and power, then the total time and power will be accurate but distance will be estimated using an RE = 1. On the other hand, if you define your workout in distance and pace, time and distance will be accurate but power will not.
Working examples
- Using %CP as effort and incline: 3km@80% + 10km@100%@1%
- Using repetitions, incline and no effort: 4x(1km@3% + 3')
- Using time duration, pace and incline: 10'@10/mi@0.5% + 2.5'@7/mi@1%
- Using a specific effort range with power: 42.2km@250w-256w
You can mix and match different types of duration and effort. For example, 3x(90"@4:30/km@3% + 4'@80%) + 1km@300w + 2mi@9:00/mi means: 3 times (90 sec at 4:30/km with 3% incline and 4 min at 80% CP/FTP with 0% incline) followed by 1km at 300 watts and 2 miles at 9:00/mile.
Feedback
Feedback is more than welcomed and will contribute to make RunCline better for everyone.
If you need any support, just email me at pcarrieres at hotmail dot com. Thanks.
How-To Pair Your Device(s)
How to connect only a foot pod
- Close Zwift or any other Bluetooth app that may interfere with your foot pod.
- Start RunCline
- Select Foot Pod and select your foot pod in the list of detected devices in range. Return to the Pairing Screen. This step is required only once. Next time, RunCline will remember your device.
- Click the Start button at the bottom of the screen when it appears.
- Start Zwift and pair with RunCline. It may appear as RunCline, Stryd or the name of the device running RunCline depending on which platform you are running Zwift.
How to connect only a Smart Treadmill
- Close Zwift or any other Bluetooth app that may interfere with your treadmill.
- Start your treadmill and make it run at any speed.
- Start RunCline
- Select Smart TM and select your treadmill in the list of detected devices in range. Return to the Pairing Screen. This step is required only once. Next time, RunCline will remember your device.
- Click the Start button at the bottom of the screen when it appears.
- Start Zwift and pair with RunCline. It may appear as RunCline, Stryd or the name of the device running RunCline depending on which platform you are running Zwift.
How to connect both a Foot Pod and a Smart Treadmill
This configuration allows RunCline to get all running metrics from the foot pod and only the incline from the treadmill. This is especially useful if you trust your foot pod more than your treadmill regarding your running speed.
- Close Zwift or any other Bluetooth app that may interfere with your foot pod.
- Start your treadmill and make it run at any speed.
- Start RunCline
- Select Foot Pod and select your foot pod in the list of detected devices in range. Return to the Pairing Screen. Select Smart TM and select your treadmill in the list of detected devices in range. Return to the Pairing Screen. These steps are required only once. Next time, RunCline will remember both of your devices.
- Click the Start button at the bottom of the screen when it appears.
- Start Zwift and pair with RunCline. It may appear as RunCline, Stryd or the name of the device running RunCline depending on which platform you are running Zwift.
Troubleshooting Tips
• Warning
Don't go around back and forth in the Pairing menus or go from the Running Screen back to the Pairing Screen. This confuses RunCline and you may get a bad pairing. If you experience any issue, kill the RunCline app (and Zwift) and restart the pairing procedure but omit the device selection. RunCline will remember your previous device selection and will automatically pair with it. The Start button will also appear by itself once the devices have been detected.
• Treadmill issues
- My treadmill is not detected
There are a couple reasons why a treadmill would not be detected. See the different causes below:
- Make sure the treadmill is powered and started (Running at any speed) BEFORE starting RunCline.
- Make sure there is no other Bluetooth app that may be paired with the treadmill.
- Your treadmill may not be supported. See below.
- My treadmill is not supported
Is your treadmill Bluetooth compatible? This is the most important question. Normally, treadmills that are Bluetooth compatible will have a compatible app that you can download to see your running stats or control the treadmill. If this is the case, you can follow the procedure below and inform the developer about your treadmill. It may be possible to make RunCline compatible with it.
Many treadmills use different kinds of Bluetooth protocols. Some will use the more common Fitness Machine Service (FTMS) or the Running Speed&Cadence which are already compatible with Zwift but some others will use a proprietary protocol that makes the treadmill only compatible with its own app. Luckily for you, it is often possible to decode these protocols and add them to RunCline.
- Install the LightBlue Explorer app on your phone.
- Select your treadmill.
- Take multiple screenshots of all the listed Bluetooth services and send them to me on Messenger, by email or even on the Zwift Running FB page.

